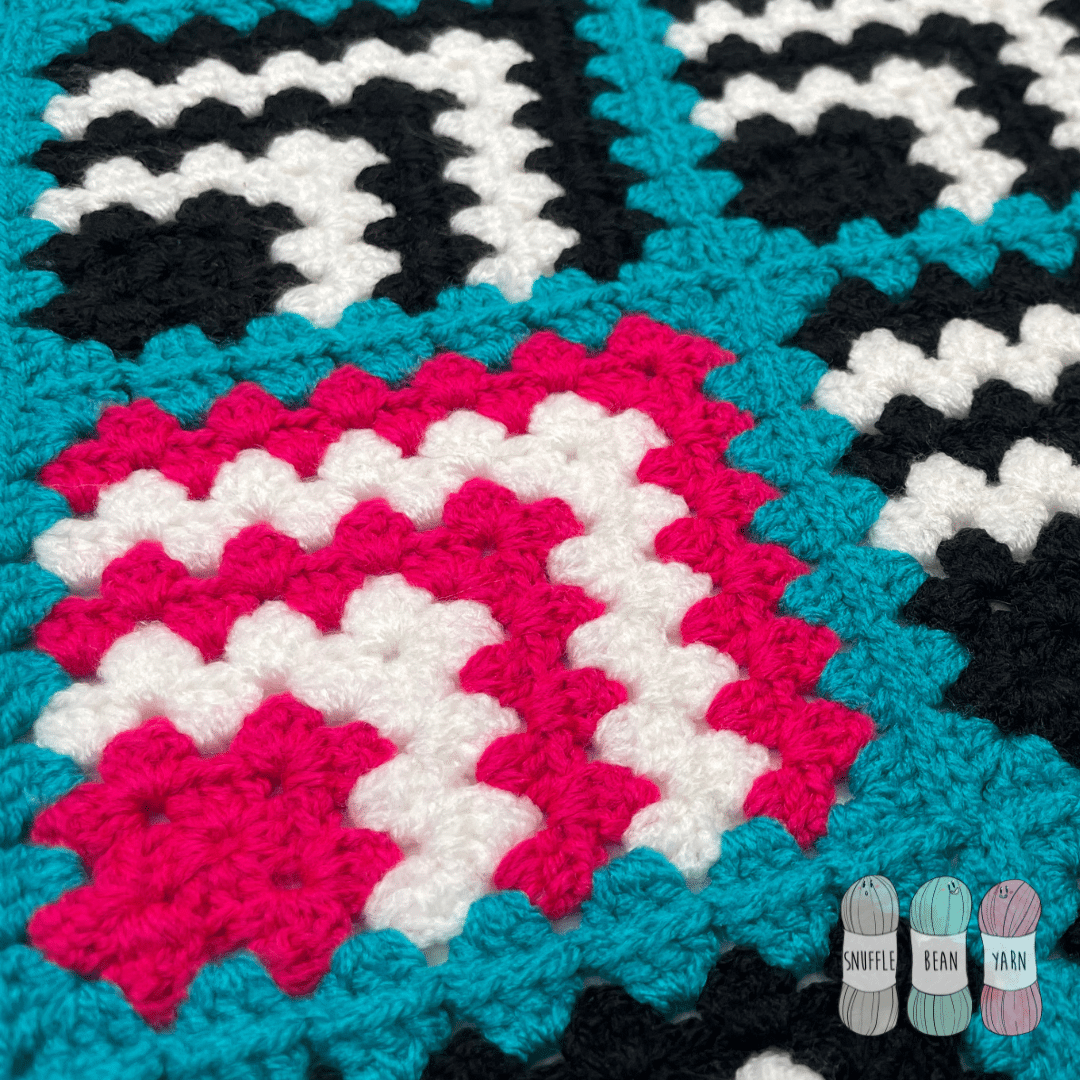
How to Crochet a Mitred Granny Square
These mitred granny squares are a great quirky twist on the classic granny square. Use them on their own to crochet a blanket like I’ve done in my tutorial, or combine them with other types of granny square and create a fun mix and match project to practice all your skills!
These squares are much simpler than they first appear, they are fun and easy to crochet, and when joined together using a contrasting colour product a fantastic modern crochet project.
I’ve popped the written pattern together below, and linked the video tutorials below – happy crocheting!
.png)
written pattern
Stitches Used:
- ch – chain stitch
- dc – double crochet
- ss – slip stitch
Foundation Round:
- Ch4, join with ss to form ring
Round 1 & 2 are worked as a normal granny square, Round 3 & 4 are worked in rows covering 2 sides of the granny square to form the mitre.
Round 1:
- Ch2 (counts as 1dc), 2dc into ring.
- Work *ch2, 3dc*
- Repeat from *to* twice more.
- ch2, join with slip stitch to 2nd chain from ch2 at start of round. TURN.
Round 2:
- ss into ch2 corner gap from row below.
- ch2, 2dc, ch2, 3dc, into same 2ch corner space.
- *3dc, ch2, 3dc* into next corner space
- Repeat *to* twice more.
- Join with ss to 2nd chain from ch2 at start of round.
- Break Yarn & Sew Ends. TURN.
Round 3:
- Join yarn into any corner space and ch2.
- 2dc into same corner space.
- Work 3dc into every space between clusters until next corner.
- Work 3dc, ch2, 3dc into corner space.
- Work 3dc into every space between granny clusters until next corner space.
- Work 3dc into corner space.
- ch2. TURN.
Round 4:
- Work 3dc into every space between clusters until next corner.
- Work 3dc, ch2, 3dc into corner space.
- Work 3dc into every space between granny clusters end of row.
- Work 1 dc into top of ch2 from beginning of previous round.
Continue working Rounds 3 & 4 until square is desired size. Break yarn after a round 4 and sew in ends.
Round 5 (Final Round):
When you begin this round, the 2 round granny from the beginning of the square should be in the bottom left hand corner, and the wrong side of the final mitred round you worked should be facing upwards.
- Join yarn to top left corner with a ss and ch2.
- Work 2dc, ch2, 3dc into same corner space.
- Work 3dc into every space along the side edge until next corner.
- Work 3dc ch2 3dc into corner space.
- Work 3dc into every space along the side edge until next corner.
- Work 3dc ch2 3dc into corner space.
- Work 3dc into every space along the side edge until you reach the original ch2 from beginnging of round.
- Join to top of ch2 with a ss, break yarn and sew in ends.
If you prefer, you can replace this final round with either a Join-as-you-go or a continuous join-as-you-go technique. I will link both videos under the tutorial for the square.
![How to Knit the “Finley” Baby Blanket [Free Video Tutorial & Written Pattern!]](https://www.snufflebean.co.uk/wp-content/uploads/2024/07/Finley-WordPress-Social-Photo.jpg)
![Chunky “No Purl” Ribbed Scarf [Free Video Tutorial & Written Pattern!]](https://www.snufflebean.co.uk/wp-content/uploads/2023/11/Ribbed-SCarf-Social.jpg)
![How to Knit the Sand Stitch [Free Video Tutorial & Written Pattern!]](https://www.snufflebean.co.uk/wp-content/uploads/2023/09/Sand-Stitch-Social.png)
![How to Knit the Open Star Stitch [Free Video Tutorial & Written Pattern!]](https://www.snufflebean.co.uk/wp-content/uploads/2025/02/Open-Star-Front.jpg)
![How to Knit the “Willow” Baby Blanket [Free Video Tutorial & Written Pattern!]](https://www.snufflebean.co.uk/wp-content/uploads/2024/02/Willow-Social-2.png)
![How to Knit Garter Rib Stitch [Free Video Tutorial & Written Pattern!]](https://www.snufflebean.co.uk/wp-content/uploads/2024/08/Garter-Rib-Front-WordPress.jpg)