How to Knit the “In Fours” Baby Blanket [Free Knitting Pattern & Video Tutorial!]
***You can purchase an INEXPENSIVE AD-FREE PDF of this pattern by clicking HERE***
I make no secret of the fact that I love to knit to relax, and that means I’m drawn to patterns that provide me with clean, modern texture, with easy to follow repeats that don’t compromise on the finished project.
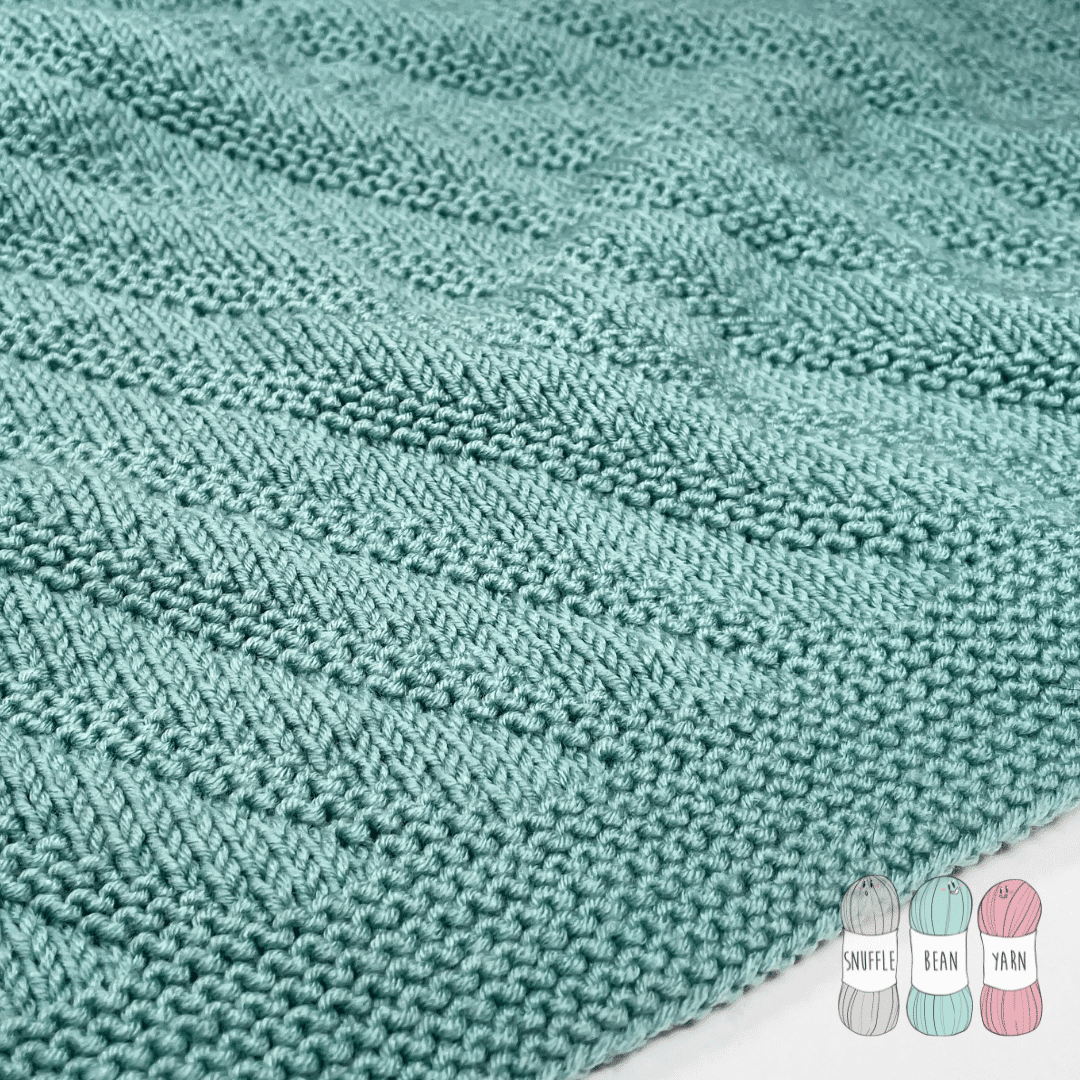
I like to think that this blanket falls into this category. It uses a rhythmic pattern repeat to create clean diagonal lines of texture, and the inbuilt garter stitch border means you have a beautifully finished blanket worked all in one piece.

I’ve named this blanket the “In Fours” Blanket, as I found myself counting to 4 whilst knitting it to remind myself of where I was in the pattern repeat, so it felt the obvious choice when it came to naming! I don’t claim to have created anything particularly unique, but it’s a blanket that I really enjoyed knitting and I’m excited to share it with you all.
I’ve popped a link to the video tutorial at the bottom of this post for those of you who prefer to have a video to follow whilst you knit.
yarn & sizing tips & tricks
I’ve chosen DK (aka Double Knitting, Light Worsted, 3 Weight) yarn for this project, but don’t let that stop you from knitting it in your own preferred weight of yarn. You will just need to adjust your cast on and number of repeats you work to accommodate the change in weight of yarn.
My instructions produce a Blanket approximately 60cm x 80cm, but for those of you wanting to adjust this size, it can easily be done using the pattern multiple of 8+4 for the middle illusion panel, and an additional 18 stitches for the garter stitch edging.
Materials Needed:
- 4mm Circular Needles (to recreate this blanket 80cm is a perfect length)
- 400g of DK Yarn – I used Stylecraft Bambino in Ocean Blue
- Scissors & Tapestry Needle for sewing in ends
- 2 Stitch Markers
Written Pattern
Stitches Used
- k – knit
- p – purl
- sl1pwyf – slip one purlwise with yarn in front.
- Pm – place marker
- Sm – slip marker
Bottom Edge
Foundation Row: Cast on 134 stitches.
Knit 16 rows as follows: K until final stitch, sl1pwyf
Main Pattern Repeat
Row 1: k9, pm, p4,*k4,p4* repeat from *to* until 9 stitches remain, pm, k8, sl1pwyf.
Row 2: k until 1 stitch remains (sm as you come across them), sl1pwyf
Row 3: k9, sm, p3, *k4,p4* repeat from *to* until 10 stitches remain, k1, sm, k8, sl1pwyf.
Row 4: k until 1 stitch remains (sm as you come across them), sl1pwyf
Row 5: k9, sm, p2, *k4,p4* repeat from *to* until 11 stitches remain, k2, sm, k8, sl1pwyf.
Row 6: k until 1 stitch remains (sm as you come across them), sl1pwyf
Row 7: k9, sm, p1, *k4,p4* repeat from *to* until 12 stitches remain, k3, sm, k8, sl1pwyf.
Row 8: k until 1 stitch remains (sm as you come across them), sl1pwyf
Row 9: k9, *k4,p4* repeat from *to* until 13 stitches remain, k4, sm, k8, sl1pwyf.
Row 10: k until 1 stitch remains (sm as you come across them), sl1pwyf
Row 11: k9, sm, k3, *p4,k4* repeat from *to* until 10 stitches remain, p1, sm, k8, sl1pwyf.
Row 12: k until 1 stitch remains (sm as you come across them), sl1pwyf
Row 13: k9, sm, k2, *p4,k4* repeat from *to* until 11 stitches remain, p2, sm, k8, sl1pwyf.
Row 14: k until 1 stitch remains (sm as you come across them), sl1pwyf
Row 15: k9, sm, k1, *p4,k4* repeat from *to* until 12 stitches remain, p3, sm, k8, sl1pwyf.
Row 16: k until 1 stitch remains (sm as you come across them), sl1pwyf
Repeat Rows 1-16 a total of 16 times (or until project is desired Length). Finish with one more “Row 1” before moving onto top edge, removing the stitch markers as you come across them.
Top Edge
Knit 15 rows as follows: K until final stitch, sl1pwyf.
Final row (Row 16): Cast off knit wise with right side facing.
Video Tutorial
If you’ve found this pattern helpful then why not leave a comment and say hi!
![How to Knit Stamen Stitch [Free Video Tutorial & Written Pattern!]](https://www.snufflebean.co.uk/wp-content/uploads/2024/04/Stamen-Front-WordPress.jpg)
![How to Crochet the Ripple Stitch [Free Video Tutorial & crochet Pattern!]](https://www.snufflebean.co.uk/wp-content/uploads/2021/07/Ripple-2.png)
![How to Knit the “Toby” Baby Blanket [Free Video Tutorial & Written Pattern!]](https://www.snufflebean.co.uk/wp-content/uploads/2023/11/Toby-Social.jpg)
Thank you! Most helpful!
I have a question about the pattern . Like on row 3 it says p3, k4 ,p4 ,do you add the purl 3 when you just finished purl 4 or just kint 4 , purl 4 the rest of the row ?
You are repeating the section between the * symbols. So the stitches before and after the * repeat parts do not count as part of the section you repeat across the row. Hope that helps. Laurelin 🙂
Lovely color and very nice pace of speech. My first time seeing your video. Iam very impressed. Thank you.
Thank you so much!
I love your tutorials. So well done. Thank you
I just wanted to say a huge thank you for your brilliant patterns and YouTube videos.
I make for a local baby bank, and your patterns are perfect, no holes!
Patterns are very clear and easy to follow.
Thank you so much! I still can’t believe that people are so lovely about the patterns I produce 🙂
Hi, thank you very much for your pattern and the YouTube video which I thoroughly enjoyed. Your speech is very clear and wonderful.
I just have a simple question regarding the ‘In Fours’ baby blanket. Is it reversible?
Thank you
Kind regards
No – the front is the side with the stitch pattern and the reverse is plain
Hi there, I love this blanket and the tutorial is great. Just a question regarding making a bigger size… Is it necessary to add the additional 18 stitches for the garter stitch edging or can I just in increase the middle illusion panel ( in multiples of 8+4) ? And with the additional 18 stitches, is that 9 extra to each side (18 extra in total) or 18 extra to each side( (36 extra in total). Thanks heaps.
You will need to add the additional 18 stitches, as the pattern multiple is just for the middle section. If you don’t add those 18 stitches and still incorporate a border your pattern multiple won’t work.
Wow you are quite a proific creator. Your patterns are lovely and I will be back for more for sure. Thanks for being so generous with your talent. Pegg
My knitting needles are always busy!
I’ve been looking for this pattern. How can I make as a scarf?
Hello, do you know how many stitches to cast on and how many repeats to do if I want to use worsted weight (#4) yarn? Thank you!
That’s what I came to ask.
For 4 wt how many to CO.
Lovely pattern. I can’t wait to knit.
I like the pattern and would like to make this lovely item.
However, I have bulky yarn and would like to use this yarn for a baby blanket. Each skein is 110 yds (100m/100g) 43% wool superwash. #10 needles.
How many cast on stitches do you recommend?? Please. Thank you.
I just started working on the “IN FOURS” baby ! blanket. I did cast on 134 sts., however on the main body pattern I keep ending up with an extra stitch. I counted row 2 to make sure I had 134 sts and I did! But, on row 3, still getting an extra stitch at the end. What am I doing wrong!
I have knitted several of your patterns and have never had a problem.
Love all your patterns!
Thank you so much for sharing and for your tutorials!
BJ