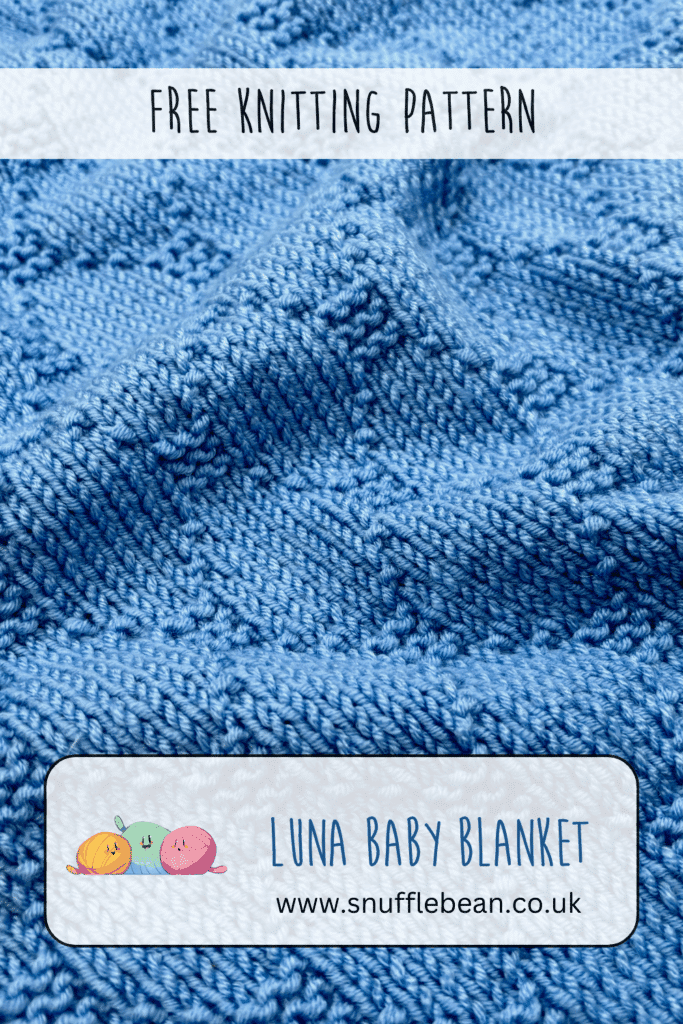
How to Knit the Luna Baby Blanket [Free Written Pattern & Video Tutorial]
***You can purchase an INEXPENSIVE AD-FREE PDF of this pattern by clicking HERE***
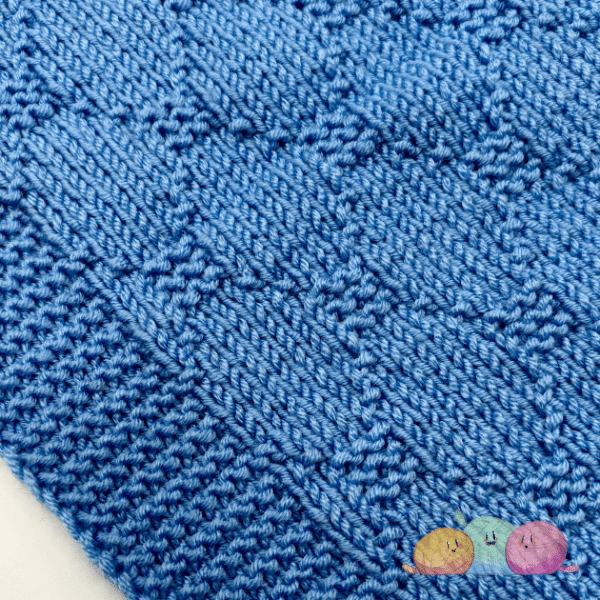
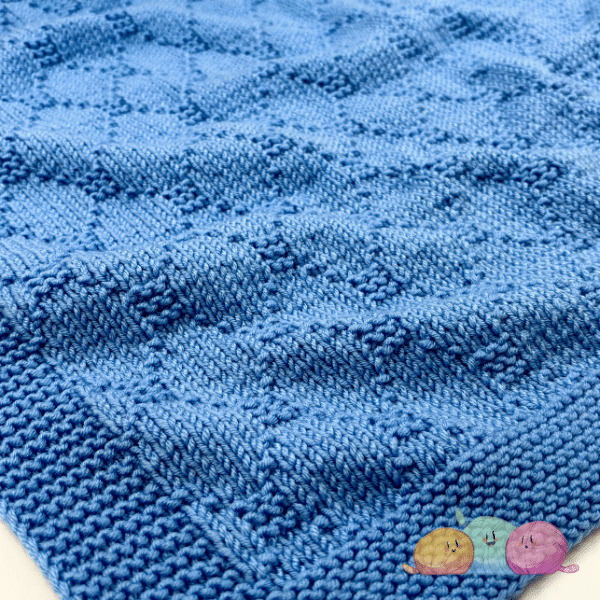
I get inspiration for my knitted baby blanket patterns from all sorts of places, and when I saw the Trellis Blanket by my friend Anita, I knew I had to try and achieve a similar sort of texture in a blanket of my own.
The thing I loved most about the Trellis design was the diagonal stripes created by the interlocking crochet squares, and luckily a pattern I was happy with flew off my needles fairly quickly.
The Luna Blanket is a 20 row repeat, and the pattern grows over a 10 stitch repeat. It never ceases to amaze me how you can use just 2 stitches to create an endless array of different designs.
I chose to knit my blanket in a soft cornflower blue, but I think this design in particular would lend itself any shade of yarn – from a classic cream or greige, to something much brighter like a emerald green. You can be as adventurous as you like with your colour choices!

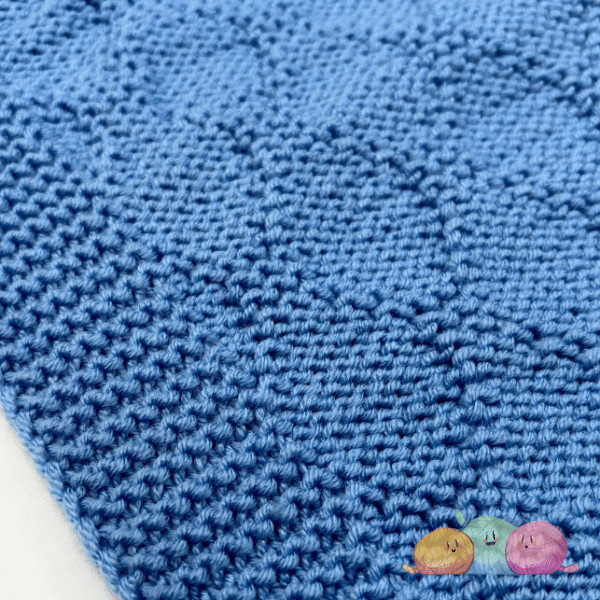
Is this pattern reversible?
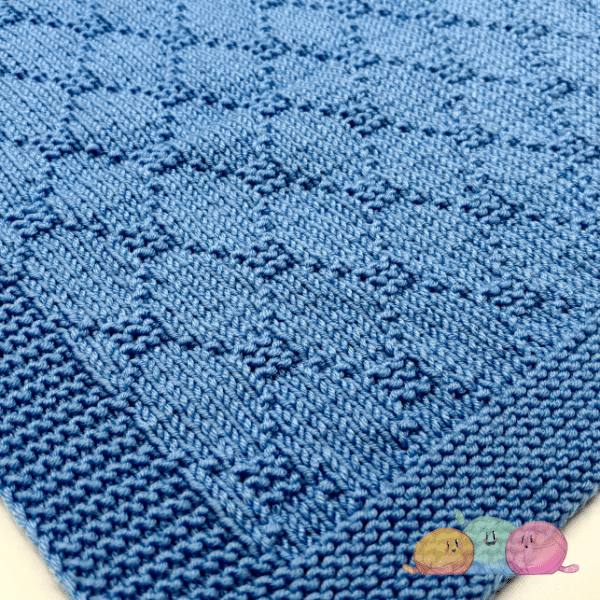
I get a lot of people asking if my blankets are reversible, so I thought it might be useful to include a little snapshot of what the back looks like.
As with a lot of my blankets, Luna is not a reversible design, the back is a lot plainer than the front. That being said, the reverse isn’t ugly or messy in any way, it just doesn’t match the texture of the front.
Right Side
Wrong Side
yarn and sizing tips & tricks
The Luna baby blanket pattern is knitted all in one piece, from bottom to top. In order to accommodate all your stitches, I recommend using a set of circular needles (at least 100cm long) as straight needles just won’t be long enough to fit your stitches on comfortably.
I’ve chosen DK (aka Double Knitting, Light Worsted, 3 Weight) yarn for this project, but don’t let that stop you from knitting it in your own preferred weight of yarn.
My instructions produce a baby blanket approximately 60cm x 80cm, perfect for using as a cot, pram or travel blanket. But don’t let that stop you from knitting this blanket in any size you want! I think it would look great scaled up as a Sofa Throw, Quilt or Bedspread.
I’ve deliberately designed this knitting pattern to be super easy for you to adjust the size of your blanket to whatever size you want/need.
To make the blanket longer, you’ll need to work more repeats of the Middle Section (the top and bottom border are worked the same regardless of the size of blanket you knit).
To adjust the width of your blanket you’ll need to cast on more (or indeed less) stitches, it can easily be done using the pattern multiple of 10+7 for the middle textured panel, and an additional 18 stitches (9 for each side) for the garter stitch edging.
Pin for later
Not ready to knit the Luna baby blanket just yet? Why not pin this image to your Pinterest so you can find it easily when you’re ready to sit down and cast on!
Materials Needed
- 4mm (Size 6) Circular Needles (to recreate this blanket 100cm is a perfect length)
- 400g of DK Yarn (800-1000m approx) – I used King Cole Cherished in Ocean.
- Scissors & Tapestry Needle for sewing in ends
- 2 Stitch Markers
Written Pattern
Stitches Used
- k – knit
- p – purl
- sl1pwyf – slip one purlwise with yarn in front.
- Pm – place marker
- Sm – slip marker
- WS – Wrong Side
- RS – Right Side
Bottom Garter Stitch Border
Foundation Row: Cast on 135 Stitches. (I use the Long Tail Cast on)
Knit 15 rows as follows: K until final stitch, sl1pwyf.
main pattern repeat
Row 1 (RS): k9, pm, k until 9 stitches remain, pm, k8, sl1pwyf.
Row 2 (WS): k9, sm, k1, p5, k1, *p3, k1, p5, k1* repeat from *to* until second marker, sm, k8, sl1pwyf.
Row 3: k9, sm, k until 9 stitches remain, sm, k8, sl1pwyf.
Row 4: k9, sm, p1, k1, p3, k1, *p5, k1, p3, k1* repeat from *to* until 1 stitch before second stitch marker, p1, sm, k8, sl1pwyf.
Row 5: k9, pm, k until 9 stitches remain, pm, k8, sl1pwyf.
Row 6: k9, sm, p2, k3, *p7, k3* repeat from *to* until 2 stitches before second marker, p2, sm, k8, sl1pwyf.
Row 7: k9, pm, k until 9 stitches remain, pm, k8, sl1pwyf.
Row 8: k9, sm, p2, k3, *p7, k3* repeat from *to* until 2 stitches before second marker, p2, sm, k8, sl1pwyf.
Row 9: k9, pm, k until 9 stitches remain, pm, k8, sl1pwyf.
Row 10: k9, sm, p2, k3, *p7, k3* repeat from *to* until 2 stitches before second marker, p2, sm, k8, sl1pwyf.
Row 11: k9, pm, k until 9 stitches remain, pm, k8, sl1pwyf.
Row 12: k9, sm, p1, k1, p3, k1, *p5, k1, p3, k1* repeat from *to* until 1 stitch before second stitch marker, p1, sm, k8, sl1pwyf.
Row 13: k9, pm, k until 9 stitches remain, pm, k8, sl1pwyf.
Row 14: k9, sm, k1, p5, k1, *p3, k1, p5, k1* repeat from *to* until second marker, sm, k8, sl1pwyf.
Row 15: k9, pm, k until 9 stitches remain, pm, k8, sl1pwyf
Row 16: k9, sm, p7, *k3, p7* repeat from *to* until second marker, sm, k8, sl1pwyf.
Row 17: k9, pm, k until 9 stitches remain, pm, k8, sl1pwyf.
Row 18: k9, sm, p7, *k3, p7* repeat from *to* until second marker, sm, k8, sl1pwyf.
Row 19: k9, pm, k until 9 stitches remain, pm, k8, sl1pwyf.
Row 20: k9, sm, p7, *k3, p7* repeat from *to* until second marker, sm, k8, sl1pwyf.
Repeat Rows 1-20 a total of 11 times (Including the initial 20 rows), then work Rows 1-14 once more before moving onto top garter stitch border.
Top Garter Stitch Border:
Knit 15 rows as follows: K until final stitch, sl1pwyf. (Remove stitch markers when knitting first row).
Final row (Row 16): Cast off knit wise with right side facing.
I hope you love Luna just as much as I do! If you’re looking for more knitted baby blanket inspiration then why not take a look at Harvey, Taylor or Noah.
![How to Knit Tumbling Moss Block Stitch [Free Knitting pattern & video tutorial!]](https://www.snufflebean.co.uk/wp-content/uploads/2025/06/cluster-v4-3-1-1.png)
![How to Crochet Blanket Stitch [Free Video Tutorial & Written Pattern!]](https://www.snufflebean.co.uk/wp-content/uploads/2022/06/blanket-stitch-blogger.png)
![How to Knit the “Riley” Baby Blanket [Free Video Tutorial & written Pattern!]](https://www.snufflebean.co.uk/wp-content/uploads/2025/08/half-linen-stitch-3.png)
![How to Knit Grid Stitch [Free Video Tutorial & Written Pattern!]](https://www.snufflebean.co.uk/wp-content/uploads/2022/07/grid-social.png)