QUICK & EASY Little Knitted Hats for Christmas! 🎄 [Free Video Tutorial & Written Pattern!]
***You can purchase an INEXPENSIVE AD-FREE PDF of this pattern HERE***
I love handmade Christmas Decorations on my tree, and over the years I’ve grown a lovely little collection – but the sad fact is that until now, none have been made by me. So I decided it was time to change that!
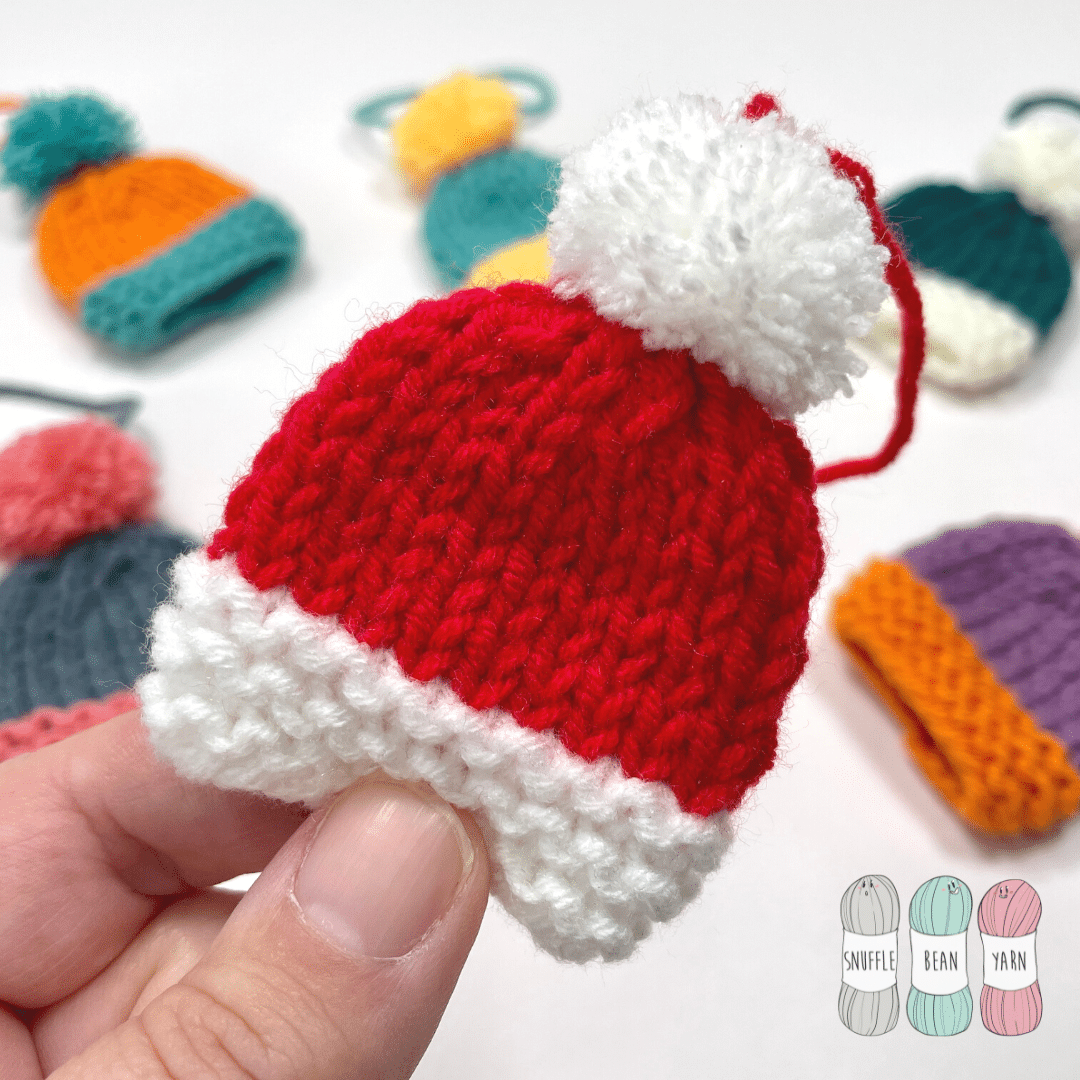
This year I’ve been enjoying making these tiny little Santa Hats for my tree and it seemed right to share them with you all so you can make them too! I don’t know if its just me, but I find everything is cuter when its in teeny tiny form!
The tiny little hats are great for using up left over scraps of yarn, and you don’t have to limit yourself to festive colours – why not mix it up like I have and create colourful little beanies instead of Santa hats!
My instructions show you how to make a hat with a hanging loop for a tree, but you could just as easily string them together and create a cute festive garland (why not thread them onto fairy lights for an even MORE Festive feel!)
So what are you waiting for? Lets Get Knitting!!

materials needed
- Small amount of DK yarn in two colours.
- 4mm knitting needles (circular or straight)
- Extra Small Clover PomPom Maker (Optional)
- Scissors
- Tapestry Needle
stitches used:
- k – knit
- p – purl
- k2tog – knit two together
- p2tog – purl two together
written pattern:
garter stitch brim:
To Start: Using Colour A – Cast on 20 stitches
Row 1: k all stitches
Row 2: k all stitches
Row 3: k all stitches
Row 4: k all stitches
Row 5: k all stitches
main body of hat
Row 6: Change to colour B, k all stitches
Row 7: p all stitches
Row 8: k all stitches.
Row 9: p all stitches.
Row 10: k all stitches.
Row 11: p all stitches.
Row 12: k all stitches.
Row 13: p all stitches.
Crown shaping:
Row 14: *k2, k2tog* repeat from *to* to end of row. (15 stitches remain)
Row 15: *p1, p2tog* repeat from *to* to end of row. (10 Stitches remain)
Row 16: *k2tog* repeat from *to* to end of row. (5 Stitches remain)
finishing your hat
With stitches still on your needle, break yarn and leave a long yarn tail. Thread yarn tail onto tapestry needle, and thread the yarn through each of the 5 stitches remaining on your needles to secure. You can now remove your knitting needle and pull to tighten. Use yarn tail to sew the hat together along the back seam.
Make a pompom using your preferred method (I used an extra small clover pompom maker). Attach pompom to hat and make a hanging loop – and you’re done!
![How to Crochet the Ripple Stitch [Free Video Tutorial & crochet Pattern!]](https://www.snufflebean.co.uk/wp-content/uploads/2021/07/Ripple-2.png)
![Chunky “No Purl” Ribbed Scarf [Free Video Tutorial & Written Pattern!]](https://www.snufflebean.co.uk/wp-content/uploads/2023/11/Ribbed-SCarf-Social.jpg)
![How to Knit the “Wren” Baby Blanket [Free Video Tutorial & Written Pattern!]](https://www.snufflebean.co.uk/wp-content/uploads/2024/01/Wren-Social.jpg)
![QUICK & EASY Little Knitted Stockings for Christmas! 🎄 [Free Video Tutorial & Written Pattern!]](https://www.snufflebean.co.uk/wp-content/uploads/2024/11/stocking-WordPress-1.jpg)
![How to Knit Pique Rib Stitch [Free Video Tutorial & Written Pattern!]](https://www.snufflebean.co.uk/wp-content/uploads/2023/10/pique-rib-Social.png)
Quick and easy to do in different colours. Hang them anywhereA
Thank you! Happy Knitting!
Lovely ideas for children to make.
Thank you. Been looking for this pattern.
Happy Knitting!
Hi, I’ve included your brilliant little knitted hat pattern in a holiday roundup on Crafts on Display. Thanks for sharing this cute project! This is the link – https://craftsondisplay.com/knitting/knit-christmas-decorations-198739/
Thank you so much!