How to Knit the "Fearne" Baby Blanket [Free Video Tutorial & Written Pattern!]
***You can purchase an INEXPENSIVE AD-FREE PDF of this pattern on Ravelry HERE or Etsy HERE***
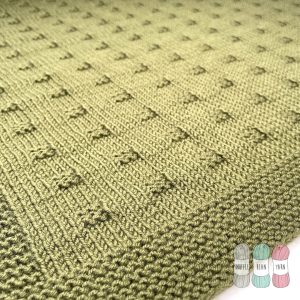
Baby blanket knitting patterns come in all shapes and styles nowadays, from traditional styles, to much more modern ones like Fearne. Not only have I chosen a sleek pattern for this design, I've knitted my sample in a lovely deep olive green - straying from the more traditional shades you often see baby blankets knitted in.
When designing Fearne, I decided I wanted to use large blocks of stockinette stitch, with little squares of texture to break it up. In the past I've been hesitant to use stockinette stitch as lots of rows of purling can become a bit tedious, but I think the 10 row repeat gives enough variety to stop that happening in this design.
I really hope you enjoy knitting this pattern as much as I did!
yarn and sizing tips & tricks
I've chosen DK (aka Double Knitting, Light Worsted, 3 Weight) yarn for this project, but don't let that stop you from knitting it in your own preferred weight of yarn. You will just need to adjust your cast on and number of repeats you work to accommodate the change in weight of yarn.
My instructions produce a Blanket approximately 60cm x 80cm, but for those of you wanting to adjust this size, it can easily be done using the pattern multiple of 8+5 for the middle textured panel, and an additional 18 stitches (9 for each side) for the garter stitch edging.
Pin for later

Materials Needed:
- 4mm Circular Needs (to recreate this blanket 80-100cm is a perfect length)
- 400g of DK Yarn - I used Stylecraft Bellissima in Overly Olive
- 2 Stitch Markers
- Scissors & Tapestry Needle for sewing in ends
Written Pattern:
Stiches Used
- k - knit
- p - purl
- sl1pwyf - slip one purlwise with yarn in front.
- Pm - place marker
- Sm - slip marker
Bottom Edge
Foundation Row: Cast on 135 stitches.
Knit 15 rows as follows: K until final stitch, sl1pwyf.
Main Pattern Repeat
Row 1 (rs): k9, pm, k until 9 stitches remain, pm, k8, sl1pwyf.
Row 2 (ws): k9, sm, p until next marker, sm, k8, sl1pwyf.
Row 3: k9, sm, k until 9 stitches remain, sm, k8, sl1pwyf.
Row 4: k9, sm, p until next marker, sm, k8, sl1pwyf.
Row 5: k9, sm, k until 9 stitches remain, sm, k8, sl1pwyf.
Row 6: k9, sm, p until 9 stitches remain, sm, k8, sl1pwyf.
Row 7: k9, sm, k until next marker, sm, k8, sl1pwyf.
Row 8: k9, sm, p5, *k3,p5* repeat from *to* until 2nd marker, p5, sm, k8, sl1pwyf.
Row 9: k9, sm, k5, *p3, k5* repeat from *to* until 2nd marker, k5, sm, k8, sl1pwyf.
Row 10: k9, sm, p5, *k3,p5* repeat from *to* until 2nd marker, p5, sm, k8, sl1pwyf.
Repeat Rows 1-10 (I worked 22 repeats in total) until project is slightly shorter than desired length (to allow for garter edging. Before starting the top Garter Stitch edge work rows 1-7 once more.
Top Edge
Knit 15 rows as follows: K until final stitch, sl1pwyf.
Final row (Row 16): Cast off knit wise with right side facing.
Video tutorial
For the more visual learners amongst you, I have a YouTube tutorial that goes alongside this pattern.
Beautiful pattern. I believe there is an error in the directions for row 4. I believe it should say purl, instead of knit.
Thank you so much for sharing.
You're absolutely right Nancy! I've corrected it now 🙂
Hello, I don't understand that row 4 says this: Row 4: k9, sm, k until next marker, sm, k8, sl1pwyf.
It seems to me that it should be k9, sm, p until next marker, sm, k8, sl1pwyf.
Hi Johanne, You are abolsutely correct, it's a typo that I've corrected now and I really appreciate you pointing that out to me! Laurelin 🙂