How to Knit a Corner to Corner Garter Stitch Blanket [Free Video Tutorial & Written Pattern!]
***You can purchase an INEXPENSIVE AD-FREE PDF of this pattern by clicking HERE***
This blanket is my go-to quick knit. It uses a super simple corner to corner method, and only 3 types of stitch used. This makes it a great project to work up when you’re in want of a nice mindless knit.
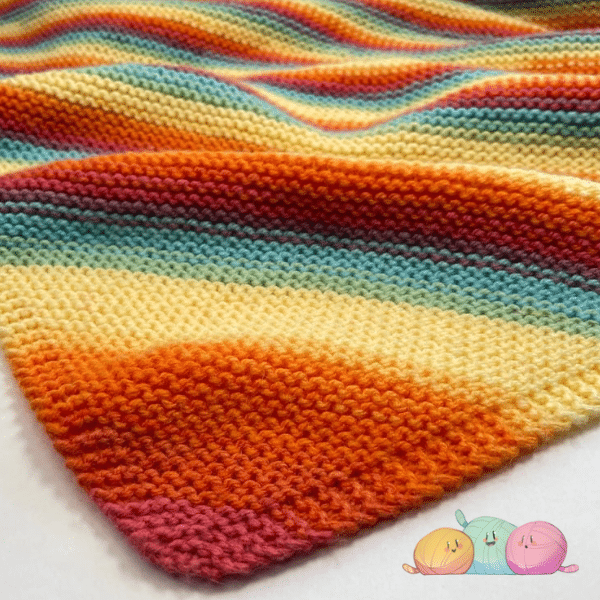
With its built in edge, and soft garter stitch pattern, the finished product is beautifully modern in its simplicity.
Although this pattern is for a blanket, it will also work brilliantly for little washcloths, or dishcloths.
pin for later
Materials Needed
- 4mm Circular knitting needle long enough to accommodate the longest section of the blanket (150cm is ideal)
- Papatya Batik DK in Shade 554-12 (for a 60x80cm baby blanket I used 2 x 100g Balls)
- Scissors
- Tapestry Needle for sewing in ends.
Stitches Used
- k – knit stitch
- kfb – knit front back
- k2tog – knit 2 together
written pattern
Increase Section
Foundation Row: Cast on 4 stitches. TURN
Row 1: k all stitches. TURN
Row 2: K1, kfb, k2. TURN
Row 3: K2, kfb, k remaining stitches. TURN.
Repeat Row 3 until project is as wide as you want the short edge of your rectangle to be. (If you are making a square blanket then knit until its as wide as you want it and then skip the “middle section” part of this pattern and head straight to the decrease).
Middle Section
Row 1: k2, k2tog, k all stitches. TURN
Row 2: k2, kfb, k remaining stitches. TURN.
Repeat Rows 1 & 2 until the longer edge of your project is as long as you want the long edge of your rectangle to be.
Decrease Section:
Row 1: k2, k2tog, k all remaining stitches. TURN
Repeat Row 1 until you have 4 stitches remaining.
Cast Off & sew in ends.
Video Tutorial:
If you’ve found this pattern helpful then why not leave a comment and say hi!
Or, if you feel ready to tackle something a little more challenging then why not have a go at my Fishermans Rib Blanket.
![How to Knit the “Sadie” Baby Blanket [Free Knitting Pattern & Video Tutorial]](https://www.snufflebean.co.uk/wp-content/uploads/2025/04/emma-3-4-1-1.png)
![How to Knit the “Casper” Baby Blanket [Free Video Tutorial & Written Pattern!]](https://www.snufflebean.co.uk/wp-content/uploads/2023/05/casper-social.png)
![How to Knit the Purl Ridge Stitch [Free Video Tutorial & Written Pattern!]](https://www.snufflebean.co.uk/wp-content/uploads/2024/05/Reverse-Ridge-Front-WordPress.jpg)
![How to Knit Speckled Rib Stitch [Free Video Tutorial & Written Pattern!]](https://www.snufflebean.co.uk/wp-content/uploads/2025/09/half-linen-stitch-6.png)
Can’t wait to make this blanket.
Yay! So glad to hear this, happy knitting!
Thank you for your lovely pattern
Thank you for the pattern. I can’t wait to give it a try
You’re Welcome! Happy Knitting 🙂
I love this pattern but having great difficulty in getting the written pattern don’t know what I am doing wrong would appreciate help in getting it if I could thank you
Hi, I don’t have all my patterns in written from yet – the ones that are available are listed on my ravelry store
Hello,
Love this pattern. Have made it for all my grands. Have to neighbors that are pregnant.
I can’t remember how many rows I knit until I started decreasing. 150 or 160.
I remember that I always used the large skein that was about a pound of yarn.
Can you help my memory. Was a little bit bigger than a receiving blanket.
Perfect size for nursing Mom’s
Thank you,
Pam
You really don’t need to worry about counting rows or stitches, just keep increasing until the blanket is the width you want it and then start decreasing.
I weigh wool and knit half the ball.
I’m on the middle section, and it seems to be slanting to the side inwards instead of a straight line along the edge. Am I doing something wrong? Or will it even out when it’s finished?
If you’re talking about the decrease edge, then when you first start the decrease rows it can look like its slanting inwards but it evens out the more you knit.
Great communication and beautiful picture. You have a lovely voice and explain things very clearly. I will be looking at more of your tutorials. You make it very easy to understand.
Thanks so much.
I used this pattern on my first blanket. It’s was so quick and easy and perfect as I’m a beginner. thank you very much!!! I’m starting one in a smaller weighted yarn for my nephew who is due in August.
Thank you so much!
When my daughter announced she was pregnant I decided to knit a temperature blanket for her pregnancy. Having knit once 30 years ago I needed help, and found your video on the corner to corner blanket something I thought I could do and dove in. My merino yarn I had and my #8 or 9 circular needles weren’t what was prescribed but I thought It would hide knitting imperfections better!!!!
I have gotten to 27 inches, for each side, and am going to add on one side for more length.
My issue is I am at 164 stitches, and have approximately 90 days until the birth
It takes 5 rows to add an inch of length, I would like to add 8 inches but may not be able as that is another 40 rows, leaving me 50 to do the decrease. I will likely use a bright pink on her birthday instead of temperature, and continue tapering.
MY QUESTION finally! what would happen if I decreased at the beginning of the row as described, as well as added a knit 2 together at the other end of the row near the “eyelet” ? would the corner be too pointy, could I try it every other row?
I am also using this as a future lesson to my Granddaughter about try, learn, improve – it does not have to be perfect!!!
Im hoping you or your followers can provide some advice as the best way to taper from 164 stitches more quickly while maintaining a semblance to a rectangle if possible.
Love this pattern, and as a beginner-level knitter it’s my go to anytime I feel like knitting something!
I’m working on a lap size blanket and wondering how I would go about making the border wider?
Love this pattern. So simple, so doable, beginner friendly. Knitting this for my child soon to come, and pregnant women at my church. Thank you!
Hi. How did you get the boarder on the blanket?
It’s knitted as part of the blanket pattern. If you follow my pattern you’ll get the same effect
Love this pattern and explanation. I’ve knit similar but increased both sides then decreased both sides after reaching the size I guesstimate.
Question colorful yarn? Do colors work evenly or how do colors work forming even stripes?
Hope this makes sense 😊
Cheers, Margaret
Hi, with variegated yarn the thickness of your stripes of colour will vary as the blanket widens. Hope that makes sense.
I love the pattern, I just wonder if its possible to make it full size? Like cover for a bed och a throw blanket?
Yes absolutely, just knit it as big as you like!
This pattern is amazing! I have just made a face washer to practice before I make a lap blanket. Just wondering, is there a way to make the border a little wider, say 4 stitches?
This pattern is fantastic, I have just made a face washer to practice before starting it as a lap blanket! Is there any way to adjust the pattern to make the border wider i.e 4 stitches instead of just 2?
Love making this. Thank you for a wonderful pattern.
Thank you for the beautiful blanket knitting pattern.
I know Margaret commented on the self-stripping yarn, but, just wondering what brand you used and where you bought it?
You said 60cm by 80cm which one was the wide 60cm or the 80cm?
Hi there – I’m knitting blankets for an organization in South Africa. My previous 2 blankets I knitted squares and it was a doozy stitching them together. At the moment I’m knitting long strips that I’ll then crochet together to form a blanket.
but most of my friends crochet blankets in one piece – from corner to corner. My crochet is very limited, so I’ve started a square with no 7 knitting needles today from corner to corner – it’s magic!!!!!!!!!!!!!!!!!!!!!!!! Absolutely love it!!!!!!!!
Thank you for showing us how to do this it means a lot, I am currently knitting for sands and also my best friend who is pregnant this video has helped me big time thank you
Hello, I’m knitting this with Mandela lion brand yarn gradient.In the Hot pink Rose Eclatant colors! I’m going to make it a throw from my sister. I’ve got 166 stitches so far, I want to make it square how do I do that? I can not find it on your site. Thank you so much. It looks amazing so far!
I love this pattern, but my finished little blanket looks like a diamond shape rather than a square. Can you give me any advice please as to how I make it more square?